Monday, November 28, 2016

Win10 - Automatic Backup - maybe finally here...

15.12.24: Backup is a word that means "effort I must do ... but not right now".

I agree. It should not mean you need to spend time doing something the system should do for you.

About 20 years ago, I developed a Dos BAT pgm (this is a techie term not used today) that automatically only updated files that have been changed. It worked well and I didn't need to think about backing up critical files on my computer.
For some reason, this approach is no longer used. Such is technology progress...

I should indicate, at this time, I do not use the backup approach outlined here, as I maintain a USB hard drive for backup and I also backup all my important files on my alternate system (I have Win10 and win7 on separate discs).

If you are still with me on this process, I will simplify the Backup and the Restore steps.

Backup

With Windows 10 File History, an easier and more comprehensive backup system is available to the average user.

File History will look after all aspects of file backup ... without you being involved. What could be easier!

It retains and manages iterations and deletes oldest when space is limited and much more.
It works with USB attached drives and much more.


Now, you need to understand a few basics before getting into this auto backup.
If you have any questions, before going further, let me know.
  1. Using a backup system requires a storage device. It shouldn't use your existing system drive (in case of hard drive failure). You will need to decide if purchasing a storage device (if you don't have extra storage devices) is agreeable right now.

2. Consider how much space is required for your important changeable files only. Pictures, music, videos should be stored elsewhere as they don't change (require updating).

3. There are other things in File History we will not go into at this time ... keep it simple.


Backup - Getting Started:

To begin using File History, you need to determine where the files will be stored and which files will be backed up. You should use this system only for important files that change ... not pictures or songs or movies.

First, you need to click on Settings in the Start Menu. 
Select the Upgrade and Security and then Backup to open the Using File History page.
Then click the Add A Drive button and Win10 will list a few locations that could hold your backup files.

Next, you need to configure File History (click the More options to link to display the Backup Options page) and determine how long to retain files. 
To save time, I suggest 'until space is needed', as it will automatically delete the oldest saved version when space is needed.
Then, you need to use the Backup These Folders section to specify the important folders you want to backup. You can also exclude files within these folders.

What Not To Backup:
Now to decide on an important item ... static important files (pictures, songs, movies, etc).
In my opinion, they should be backed up but, as they never change, I strongly suggest one-time copying to an external source such as DVDs or USB sticks or SDcards. They now have 256GB SDcards for around $10 on eBay. While they don't work as a drive your system can us, you can copy data to them and use as external storage device.


Go back to the top of the backup section and click on Backup Now. 

The initial backup may take some time so don't turn your computer off until it indicates backup is completed.

That's all you need to do to setup and run the back up of your files.

The next consideration is restoring a file from File History (covered in this blog item).

Restore - Before investing in a backup procedure, you should always ensure the restore process is easily understood and really works as you expect. Win10 has included a quite comprehensive restore you should find works quite easily.

Restore - Getting Started

Let me know if you have any questions, during the review of the above and any time afterwards.

Wednesday, October 5, 2016

Micro SD cards

16.10.03 - Have you ever wondered what a micro SD card is or where they are used or, more importantly, which card is best for a specific device?

As I am currently upgrading my cards (smartphone and camera) to 128gb size, thought I would let you know what i have reviewed.

Micro SD cards come with a case to enable use in devices that can't use the micro card itself.
As i want to interchange usage, I always buy the micro card that comes with the case.

My preferred method of use is extract the micro card from the camera or smartphone, place it in the case and then insert in the computer card slot, to back up data. 

Most cameras and smartphones allow for storage size of 128gb now and some allow for 200gb. But the 200gb cards are still quite a bit more expensive for high speed read/write.

Understanding read/write speed is important for certain applications on cameras and smartphones.
It is getting a little complicated and I will try to simplify in this blog item.

A Few Specifics:
1. Faster speed is better but more expensive
2. Read speed is always faster than write speed
3. Most manufacturers present read speed and not write speed
4. Write speed is important for HD and 4K (coming soon) video
5. Higher read speed helps when transferring data to your computer
6. The quality manufacturers are: SanDisk, Samsung, Kingston, Toshiba and Lexar 
7. Class 10 should be the only type SD card you buy

MicroSD card Specs:
1. MicroSDXC (XC - extended capacity) are cards above 32gb
2. MicroSDXC UHS-I (ultra high speed or U1) writes at higher than a Class 10 minimum speed and reads up to a maximum of 104MB/s (MB/s - characters per second)
3. U3 (UHS-III) and V30 refer to video speeds that cannot be used on current equipment but are the highest available today and will be supported in new devices 
4. Refer to the pic (click to enlarge) or check this link for rated speeds of various manufacturers

In my opinion, you are best advised to buy a UHS-I microSD card. 
SanDisk Ultra is a tried/true 128gb product and it has approx 80 read and 60 write ... which will work very well for everything you do on a smartphone or camera (even 60fps 1080p video).
If you are interested in the best price (and can wait for delivery), eBay has the 128gb for $15 (including delivery).
A good alternative is the Samsung Evo+ 128gb ($16 on eBay) which has 80 read and 20 write speeds.

But, check your user manual to ensure it handles 128gb and UHS-I type cards. 


Monday, February 1, 2016

Protecting your PC - Windows 10

16.02.01: When you install a new operating system (Windows 10, etc), it is important to ensure you can recover if a problem prevents you from starting your computer.

As a lot of PC owners are now moving to Windows 10 (most times without really wanting/needing to), it is very important you to do two things after moving to the new system.

Backup and Restore in Windows 10


Here is a very good section that outlines various methods of preparing for recovery from inability to access your Win10 system - Backup and Restore in Windows 10right-click the Start button, and then select Control Panel, and then Backup and Restore (Windows 7).

On this screen, you will see two main approaches to recovering your PC: 
 - Create a System Image - lots of space (hard drive or disc) required, 
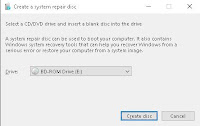
 - Create a System Repair Disc - one disc required. I suggest Repair Disc.
You will also notice File History on bottom left of this screen. Pls refer to blog item Win10 - Automatic Backup for details on this backup type.


Following, are the two minimum things you should do after installing Win10. 


1. Create a System Repair Disc


It is quite easy and not time consuming to create a disc (or USB device).
a. Right-click on Start icon and then Control Panel.
b. Under System and Security, select Backup and Restore (Windows 7).
c. Select Create a System Repair Disc and place a blank DVD or CD in the drive and select 'create disc'.
d. When it is finished, label the disc and date it. 


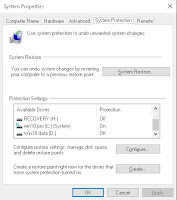
2. Create a Windows 10 System Restore Point 


This Microsoft site outlines backup procedures for Win10.
a. In the Create a Restore Point section, right-click the Start  button, then select Control Panel and then System and Maintenance and then System.
b. Ensure all drives under Protection Settings are off except the c-drive.
c. click on Create and enter a description. 
d. You are now ready to create the first restore point.


3. Now you need to review my blog item Windows 10 - What to Watch out for to ensure you agree with the defaults Microsoft has made on your behalf.