As a lot of PC owners are now moving to Windows 10 (most times without really wanting/needing to), it is very important you to do two things after moving to the new system.
Backup and Restore in Windows 10
On this screen, you will see two main approaches to recovering your PC:
- Create a System Image - lots of space (hard drive or disc) required,
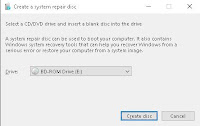
- Create a System Repair Disc - one disc required. I suggest Repair Disc.
You will also notice File History on bottom left of this screen. Pls refer to blog item Win10 - Automatic Backup for details on this backup type.
Following, are the two minimum things you should do after installing Win10.
1. Create a System Repair Disc

It is quite easy and not time consuming to create a disc (or USB device).
a. Right-click on Start icon and then Control Panel.
b. Under System and Security, select Backup and Restore (Windows 7).
c. Select Create a System Repair Disc and place a blank DVD or CD in the drive and select 'create disc'.
d. When it is finished, label the disc and date it.
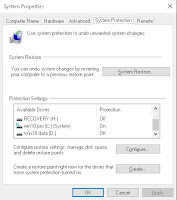
2. Create a Windows 10 System Restore Point

This Microsoft site outlines backup procedures for Win10.
a. In the Create a Restore Point section, right-click the Start button, then select Control Panel and then System and Maintenance and then System.
b. Ensure all drives under Protection Settings are off except the c-drive.
c. click on Create and enter a description.
d. You are now ready to create the first restore point.
3. Now you need to review my blog item Windows 10 - What to Watch out for to ensure you agree with the defaults Microsoft has made on your behalf.
